Scheduled Search
Scheduled search lets you save a FuseQL query and run it automatically on a schedule you define, such as every hour or every day at midnight. Each run delivers its results to a notification you choose, so you can monitor your data without running the query by hand.
Overview
Each scheduled run delivers results to one of two notification types:
-
Email - Recipients receive an email that previews the beginning of the result table inline, with the full result set attached as a CSV file.
-
Lookup table - Results are written to an existing lookup table, either merged with the current contents or replacing them completely.
An optional threshold controls whether the notification fires. For example, with an hourly schedule, recipients receive an email (or the lookup table is updated) only when the threshold is met at that scheduled tick.
Scheduled search follows folder-based RBAC. Anyone with the correct folder permissions can create, edit, delete, pause, and resume a scheduled search.
Configure SMTP for email delivery
Before a scheduled search can deliver results by email, your cluster must have an SMTP configuration. Kloudfuse uses one cluster-wide SMTP block for both Grafana alert emails and scheduled-search emails, so this only needs to be set up once.
| SMTP is required only for the Email notification type. The Lookup table notification does not use SMTP. |
Add the following global.smtp block to your cluster values file (custom-values.yaml), using the values for your own SMTP provider:
global:
  smtp:
    enabled: true
    host: smtp.gmail.com    (1)
    port: 587               (2)
    fromAddress: no-reply@example.com    (3)
    fromName: KfuseAlerts
    skipTLSVerify: false
    existingSecret: smtp-secret
    userKey: user
passwordKey: password| 1 | The SMTP server host for your provider. smtp.gmail.com is shown as an example; use your own provider’s host. |
| 2 | The SMTP port for your provider (commonly 587 for STARTTLS or 465 for SSL). |
| 3 | Replace with your own SMTP sender address. |
The existingSecret field references a Kubernetes secret that holds your SMTP username and password. The credential values themselves live only in the secret; the values file just points at them:
-
existingSecretis the name of the secret. You can name the secret anything you want, as long as this value matches the name of the secret you create. -
userKeyis the name of the key within the secret that holds the SMTP username. -
passwordKeyis the name of the key within the secret that holds the SMTP password.
Create the secret in the Kloudfuse namespace before deploying, using key names that match userKey and passwordKey:
kubectl -n kfuse create secret generic smtp-secret \
  --from-literal=user=<smtp-username> \
--from-literal=password=<smtp-password>Scheduled Search page
The Scheduled searches page lists every scheduled search that has been created.

The list displays the following information for each scheduled search:
| Column | Description |
|---|---|
Status |
Whether the scheduled search is Active or Paused. |
Name |
The name assigned when the scheduled search was created. |
Query |
The FuseQL query that runs at each tick. |
Contact point |
The email recipients or lookup table that receives the results. For a lookup table, the write mode ( |
Folder |
The folder the scheduled search is placed in. |
Schedule |
How often the search runs, for example Every 6 hours or Daily at midnight. |
Last run |
The outcome and time of the most recent run. A run icon indicates whether the run was scheduled or manual. |
Next run |
When the search runs next, or |
From this page you can click a scheduled search to open its info panel, or edit, pause, resume, or delete it. Use the Create scheduled search button in the top right to open the Create scheduled search page.
Info panel
Click a scheduled search to open an info panel that shows its full configuration along with a history of recent runs.
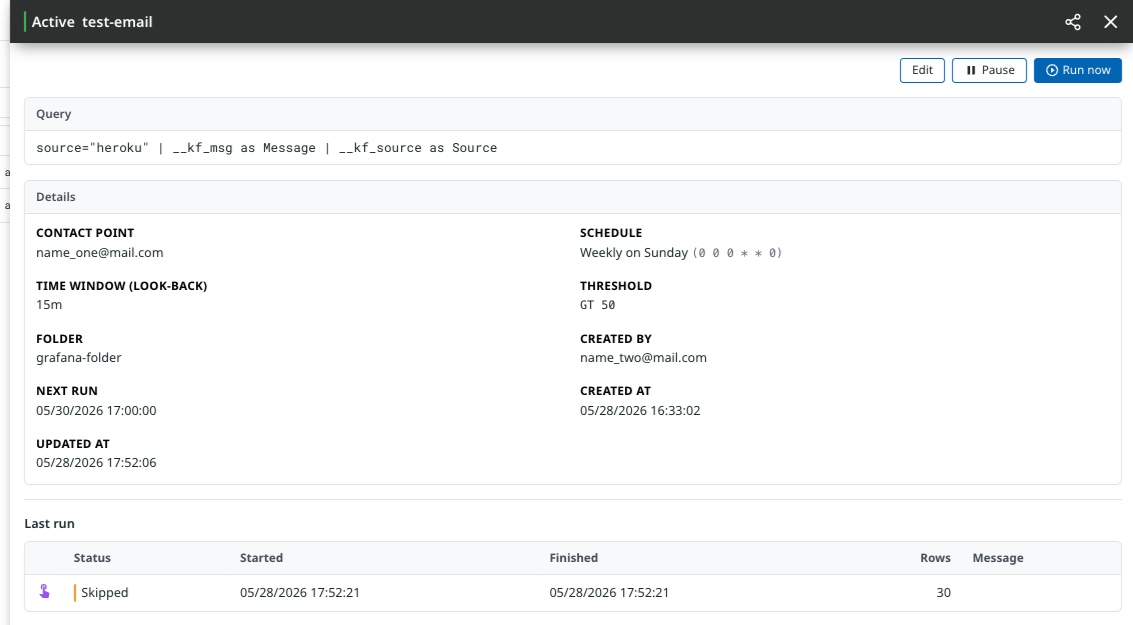
The Details section shows the contact point, schedule (in both readable and cron form), time window, threshold, folder, who created it, and the created, updated, and next-run timestamps. From the top of the panel you can Edit or Pause the scheduled search, or select Run now to trigger a run immediately instead of waiting for the next scheduled tick. A manual run does not reset the schedule.
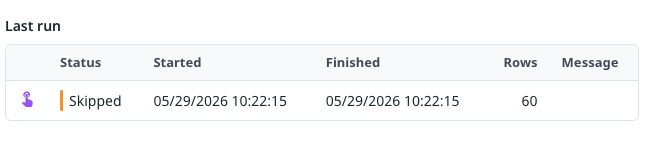
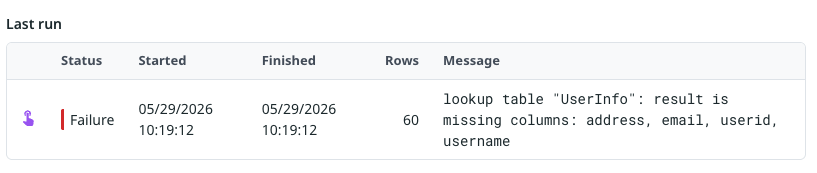
The Last run table lists recent runs with their status, start and finish times, row count, and any message. An icon next to each run indicates how it was triggered:
-
 A blue clock indicates a scheduled run.
 -
 A purple press indicates a manually triggered run.
A run can finish with one of the following statuses:
-
Success - The run completed and the notification fired.

-
Skipped - The threshold was not met, so the notification did not fire.
-
Failure - The run did not complete. The Message column shows the returned error.
Create a Scheduled Search
The Create scheduled search page requires a name, a FuseQL query, a notification, a schedule, and a time window.
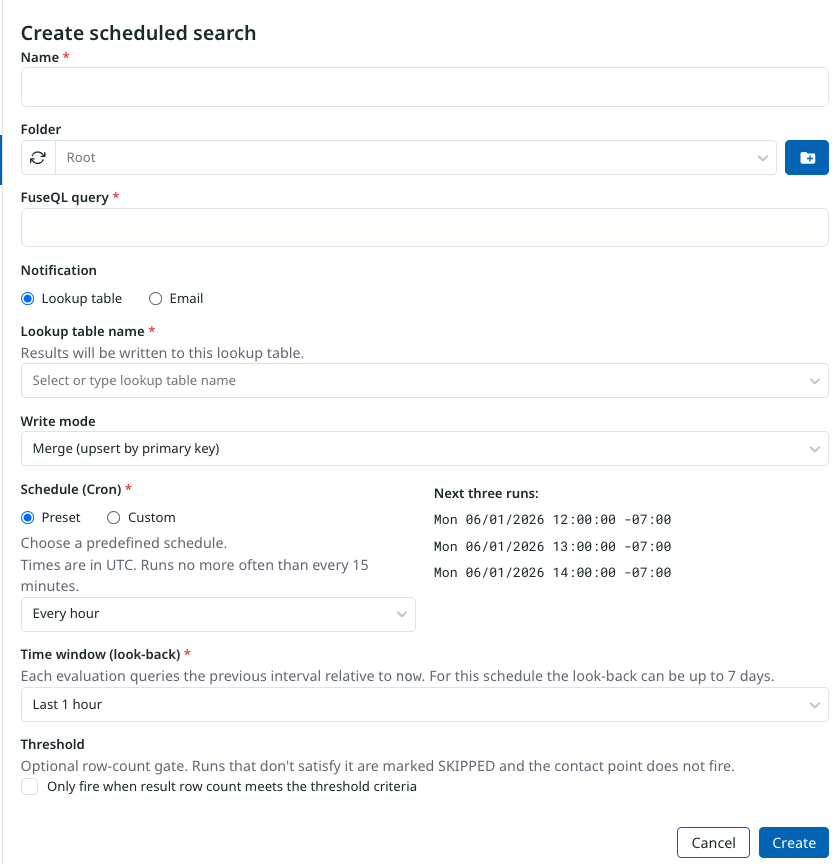
- Name
-
A name for the scheduled search. The name does not have to be unique; each scheduled search has its own unique ID.
- Folder
-
The folder the scheduled search is placed in. When RBAC is enabled, you must select a folder that you have permissions for. You can also create a new folder using the folder icon.
- FuseQL Query
-
The query to run at each scheduled tick.
- Notification
-
Choose where results are delivered:
-
Lookup table - Select an existing lookup table in Lookup table name. The FuseQL query must return the same columns as the lookup table. For example, if the lookup table has columns for
Timestamp,Message, andSource, the query must return those columns. Use Write mode to choose whether each run merges with the current contents of the lookup table (upsert by primary key) or replaces them completely. -
Email - Enter one or more recipients. Each run emails a preview of the result table inline and attaches the full result set as a CSV file.
-
- Schedule (Cron)
-
Choose Preset to select from a set of predefined cron schedules, or Custom to enter your own cron expression. Times are in UTC, and a search runs no more often than every 15 minutes. A Next three runs preview shows when the search will run next.
- Time window (look-back)
-
How far back each run queries, relative to now. The allowed look-back depends on how often the search runs and is validated when you save. See Look-back limits.
Look-back limits
Each run queries the previous interval relative to now. The maximum look-back is restricted by how often the scheduled search runs, so that frequent schedules cannot query unbounded ranges of data:
| Schedule period | Maximum look-back |
|---|---|
Every 15 minutes or less |
1 day |
15 minutes - 1 hour |
7 days |
1 - 3 hours |
15 days |
3 - 12 hours |
30 days |
Greater than 12 hours |
90 days |
Threshold
The threshold is an optional row-count gate. Select Only fire when result row count matches a threshold to fire the notification only when a condition you specify is met. For example, you can configure a scheduled search to send an email only when the row count is greater than 50.
If the threshold is not met when the scheduled search runs, the run is marked Skipped: the notification does not fire, and the run appears with a Skipped status in the recent runs history.
