Deploy Kloudfuse across multiple AWS Accounts
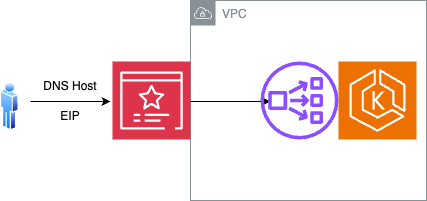
This network diagram describes the deployment architecture for Kloudfuse when using PrivateLink and VPC Endpoint in AWS. Also, see Regional Consumption Tracking.

To set up multi-account Kloudfuse deployment, complete these tasks:
 Configure ACM for secure Kloudfuse UI access
AWS supports configurations with TLS termination directly on the AWS NLB that backs the Kloudfuse ingress service.
Complete these tasks to fully configure TLS termination with AWS Certificate Manager.
Prerequisites
-
A DNS host name.
-
A certificate with this DNS host name, issued by the AWS Certificate Manager. See AWS documentation What is AWS Certificate Manager?.
-
Elastic IPs for the DNS host name for the ingress load balancer. To allocate IP addresses from AWS Elastic IP, see AWS documentation Elastic IP addresses.
Configure Helm Values
There are three options for configuring helm values:
Minimal configuration of nginx-ingress controller with ACM
tls:
  enabled: false
  awsAcmEnabled: true

ingress-nginx:
  controller:
    service:
      annotations:
        service.beta.kubernetes.io/aws-load-balancer-type: external
        service.beta.kubernetes.io/aws-load-balancer-nlb-target-type: ip
        service.beta.kubernetes.io/aws-load-balancer-scheme: internet-facing
        service.beta.kubernetes.io/aws-load-balancer-cross-zone-load-balancing-enabled: 'true'
        service.beta.kubernetes.io/aws-load-balancer-eip-allocations: <REPLACE ELASTIC IP ALLOCATION IDs HERE, comma separated>
        service.beta.kubernetes.io/aws-load-balancer-ssl-cert: "<REPLACE AWS ACM CERTIFICATE ARN HERE>"
        service.beta.kubernetes.io/aws-load-balancer-ssl-ports: "443"
        service.beta.kubernetes.io/aws-load-balancer-backend-protocol: "tcp"
      external:
        enabled: true
      targetPorts:
https: httpConfiguration of nginx-ingress controller, enabling host based routing (Only External Load Balancer)
This configuration restricts the Kloudfuse access to the host specified in the configuration.

tls:
  enabled: false
  awsAcmEnabled: true
  host: <<External facing DNS host>>

ingress-nginx:
  controller:
    service:
      annotations:
        service.beta.kubernetes.io/aws-load-balancer-type: external
        service.beta.kubernetes.io/aws-load-balancer-nlb-target-type: ip
        service.beta.kubernetes.io/aws-load-balancer-scheme: internet-facing
        service.beta.kubernetes.io/aws-load-balancer-cross-zone-load-balancing-enabled: 'true'
        service.beta.kubernetes.io/aws-load-balancer-eip-allocations: <REPLACE ELASTIC IP ALLOCATION IDs HERE, comma separated>
        service.beta.kubernetes.io/aws-load-balancer-ssl-cert: "<REPLACE AWS ACM CERTIFICATE ARN HERE>"
        service.beta.kubernetes.io/aws-load-balancer-ssl-ports: "443"
        service.beta.kubernetes.io/aws-load-balancer-backend-protocol: "tcp"
      external:
        enabled: true
      targetPorts: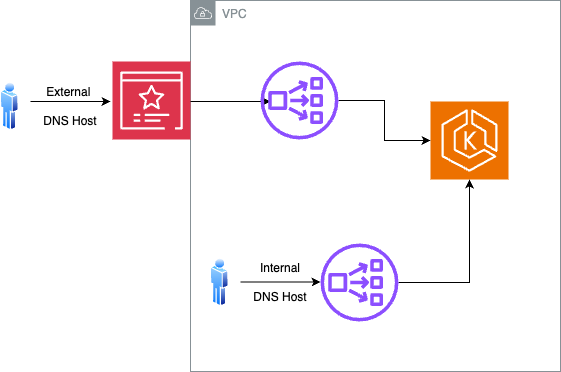
https: httpConfiguration of nginx-ingress controller, enabling host based routing (Both Internal and External Load Balancer)
This configuration restricts Kloudfuse access to the host (both internal and external) specified in the configuration.
-
The internal load balancer can be used only for the ingest path, ingesting MELT data.
-
The external load balancer is used only for the query path.
tls:
  enabled: false
  awsAcmEnabled: true
  host: <<External facing DNS host>>
  ingestInternalHost : <<Internal DNS host>>

ingress-nginx:
  controller:
    service:
      annotations:
        service.beta.kubernetes.io/aws-load-balancer-type: external
        service.beta.kubernetes.io/aws-load-balancer-nlb-target-type: ip
        service.beta.kubernetes.io/aws-load-balancer-scheme: internet-facing
        service.beta.kubernetes.io/aws-load-balancer-cross-zone-load-balancing-enabled: 'true'
        service.beta.kubernetes.io/aws-load-balancer-eip-allocations: <REPLACE ELASTIC IP ALLOCATION IDs HERE, comma separated>
        service.beta.kubernetes.io/aws-load-balancer-ssl-cert: "<REPLACE AWS ACM CERTIFICATE ARN HERE>"
        service.beta.kubernetes.io/aws-load-balancer-ssl-ports: "443"
        service.beta.kubernetes.io/aws-load-balancer-backend-protocol: "tcp"
      external:
        enabled: true
      targetPorts:
        https: http
      internal:
        enabled: true
        annotations:
          service.beta.kubernetes.io/aws-load-balancer-internal: "true"
          service.beta.kubernetes.io/aws-load-balancer-type: nlb
          service.beta.kubernetes.io/aws-load-balancer-cross-zone-load-balancing-enabled: 'true'
          service.beta.kubernetes.io/aws-load-balancer-ssl-cert: "<REPLACE AWS ACM CERTIFICATE ARN HERE>"
          service.beta.kubernetes.io/aws-load-balancer-ssl-ports: "443"
          service.beta.kubernetes.io/aws-load-balancer-backend-protocol: "http"
        targetPorts:
https: httpConfigure the Load Balancer
You must configure the internal load balancer for sending agent data on an internal network.
To accomplish this, update the certificate for the external load balancer, and ensure that it contain the domain name for the internal load balancer. Update the DNS entries as required.
ACM only allows immediate subdomains, such as *.domain.com, or sibling domains, such as internal.domain.com. For example, if observability.domain.com hosts the Kloudfuse stack, you can route internal traffic to internal.observability.domain.com. The Certificate can contain both two domain names.
After resolving the ACM certificate, update the custom-values.yaml file’s ingress section for the internal controller.
Internal load balancer configuration in custom-values.yaml
ingress-nginx:
  controller:
    service:
      annotations:
      <<< external annotations done before >>>
      external:
        enabled: true
      internal:
        enabled: true
        annotations:
          service.beta.kubernetes.io/aws-load-balancer-internal: "true"
          service.beta.kubernetes.io/aws-load-balancer-type: nlb
          service.beta.kubernetes.io/aws-load-balancer-cross-zone-load-balancing-enabled: 'true'
          service.beta.kubernetes.io/aws-load-balancer-ssl-cert: "<REPLACE AWS ACM CERTIFICATE ARN HERE>"
          service.beta.kubernetes.io/aws-load-balancer-ssl-ports: "443"
          service.beta.kubernetes.io/aws-load-balancer-backend-protocol: "http"
        targetPorts:
https: http Configure secure ingestion
Configure secure ingestion with private DNS and VPC Endpoint, using PrivateLink.
Configure Customer Account 2
-
Connect to the Kubernetes cluster that hosts the Kloudfuse stack installation, and list the network load balancer created by the stack.
The following command returns the load balancer name in the following format:
a081addcedc4d299cfa6asdf2143bsdf9-7fe3asf1be2easd.elb.us-west-2.amazonaws.com.Find Network Load Balancer Namekubens kfuse kubectl get service | grep ingress | grep internal | awk -F' ' '{print $4}'code -
In the AWS console on the VPC dashboard, select Endpoint Services.
-
Create an Endpoint Service.
-
Select the load balancer you retrieved earlier as the endpoint service target.
-
Wait until the VPC endpoint status changes to Available.
-
Select the VPC endpoint, choose Actions, and then select Add principals to allowlist.
-
Add the ARN of the target account for access, using the following format:
arn:aws:iam::<Customer-Account-1-ID>:root. -
After entering the value, select Add to Allowlist principals.
-
Navigate to the VPC endpoint service details page, and copy and save the Service name. It should look similar to the following:
Service Namecom.amazonaws.vpce.us-west-2.vpce-svc-asasdf96asdfsadf6codeYou must have it to complete the Configure Customer Account 1 task.
Configure Customer Account 1
-
Create a VPC endpoint in the consumer account 1.
Navigate to the VPC dashboard, select Endpoints, and click Create Endpoint.
-
Under Service category, choose Other endpoint services.
-
Enter the service name of the VPC in Service settings; recall that you generated this endpoint service name in this step.
-
Select Verify to validate the service name.
-
-
Under VPC, select the VPC of customer account 1 that you plan to connect to customer account 2.
Under Security group, select the security group associated with the VPC of customer account 1.
-
-
Click Create endpoint.
-
The VPC endpoint must have a pending acceptance status, meaning that you must accept the request in customer account 2.
Navigate to the VPC dashboard of customer account 2, choose Endpoint Services, select the endpoint service, and then select the Endpoint Connections where the pending connection appears.
Select the pending connection, navigate to Actions, and choose Accept the endpoint connection request.
-
Confirm the acceptance, and wait for the endpoint to move from Pending status to Available status.
-
Navigate back customer account 1. Under Endpoint details, review the list of DNS names. Copy and save the first entry to enable connecting to the VPC endpoint from any availability zone. It would be of the form
vpce-sasdgsadfasdf-01z8ed5t.vpce-svc-asasdf96asdfsadf6.us-west-2.vpce.amazonaws.com. -
Update the
dd-values-kfuse.yamlfile by replacingdd_urlfor various streams using the DNS name obtained in this step:datadog: dd_url: "http://vpce-sasdgsadfasdf-01z8ed5t.vpce-svc-asasdf96asdfsadf6.us-west-2.vpce.amazonaws.com/ingester" ... process_config: process_dd_url: "http://vpce-sasdgsadfasdf-01z8ed5t.vpce-svc-asasdf96asdfsadf6.us-west-2.vpce.amazonaws.com/ingester" events_dd_url: "http://vpce-sasdgsadfasdf-01z8ed5t.vpce-svc-asasdf96asdfsadf6.us-west-2.vpce.amazonaws.com/ingester" ... orchestrator_explorer: orchestrator_dd_url: "http://vpce-sasdgsadfasdf-01z8ed5t.vpce-svc-asasdf96asdfsadf6.us-west-2.vpce.amazonaws.com/" ... logs_config: logs_dd_url: "vpce-05ea299fea1593ce3-01z8ed5t.vpce-svc-05ccc49663c67653f.us-west-2.vpce.amazonaws.com:80"code -
Re-install the agent with updated values.
